Fabric Basket Tutorial:
Make fun baskets with your favorite fabrics using this easy-to-follow tutorial. Using your chosen fabrics or my Raw Edge Fabric Weave Pattern, you can turn colorful fabrics into artsy storage solutions, handmade Easter baskets, or beautiful home decor. This tutorial inspires creativity by letting you mix and match fabrics, making each basket a personal statement. The raw edge weaving technique adds uniqueness, ensuring the baskets are both special and practical. Collect your fabrics, follow the easy steps, and see your stylish storage come alive!
Baskets are a straightforward pattern once you get the hang of it. If you haven’t made them before, I recommend watching the video tutorial before you begin.
Basket Sizes:
Small Basket: 4” H x 6” L x 4” D (bottom)
Medium Basket: 4” H x 10” L x 4” D (bottom)
Tall Basket: 7” H x 5.5” L x 4” D (bottom)
Large Basket: 6” H x 10” L x 4” D (bottom)
Materials Needed:
Assorted non-directional cotton fabrics, or finished fabric weaves from one of the two Raw Edge Fabric Weave Patterns. See my blog post about directional vs non-directional fabrics.
Fusible interfacing or fusible fleece - 1 1/4 yard total to complete the (4) baskets
Thread (matching the fabric)
Scissors
Rotary cutter and cutting mat
Quilting ruler
Iron
Sewing machine
Pins or fabric clips
Fabric Needed:
(2) 24” x 20” completed fabric weaves from Weave Pattern to complete all (4) baskets.
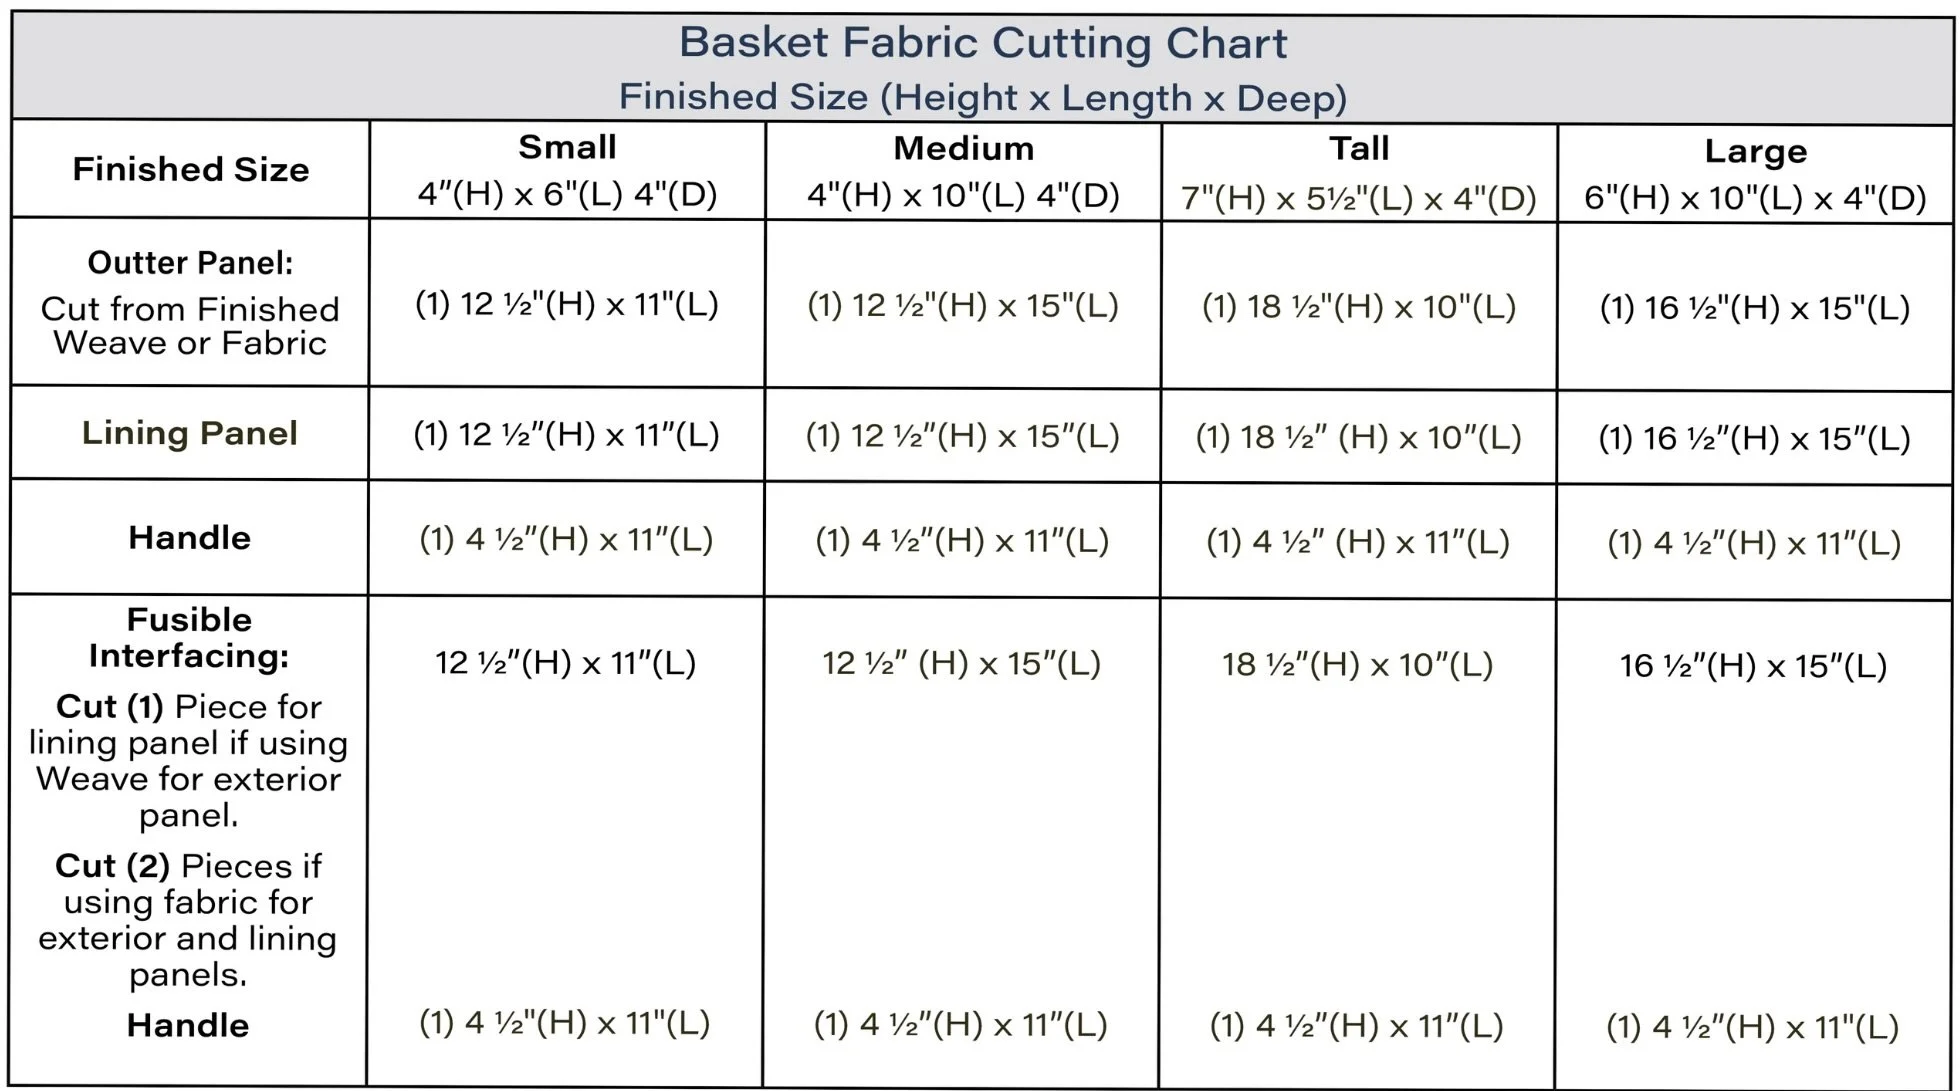
Or, cut fabric pieces in the sizes indicated in the Cutting Chart. Fat Quarters would work well. It’s fun to use different fabrics for the external and lining panels.
CUTTING INSTRUCTIONS:
Cut pieces for the size(s) of basket(s) you would like to make. You will need (1) front panel, (1) lining panel, (1) handle, and fusible interface for each piece of cut fabric. *NOTE: If cutting from a finished fabric weave, you will not add the interfacing to the front panels because it will already be attached.
Sewing and assembly Instructions:
Apply Fusible Interfacing: Iron the fusible interfacing or fleece onto the wrong side of the fabric pieces according to the manufacturer's instructions. This will give your baskets extra stability.
Make Handle: Fold the 4 1/4” x 11” strip in half lengthwise, with the wrong sides together, and press. Open the fold and fold one side, wrong sides together, to the center fold line. Repeat with the other side. Fold in half again and press—topstitch 1/8” away from each edge. * See instructions in video tutorial for demonstration.
Fold the External and Lining Panels: Lengthwise (Fold lines indicated with dashed lines), with right sides together, clip each side, leaving the top open. Sew along the clipped edges using a 1/4-inch seam allowance. Press the seams open.
Measure 2” Squares for the Bottom Corners: Using a quilter’s ruler, line up a 2” square on the ruler along each corner, mark the square with a pencil, and cut out the squares with scissors.
Sew the Corner Seams: For each corner, pull the cut corner open, match the seam to the bottom fold line, line up the edges, and clip. Sew all four corners with 1/4” seams.
Turn the Lining Panel Right Side Out: Set aside.
Attach the Handle to the Exterior Panel: Mark the center points between the outer seams, on the exterior panel. Keeping the panel inside out, insert the handle, clip it at the center points, and sew with 1/4 seams on each side.
Assemble Basket: Place the lining panel inside the external panel with the right sides together. Clip around the top, leaving a gap big enough for your hand to reach in and pull the right side out. Sew around the perimeter with 1/4” seam, leaving the gap open.
Turn the Basket Right Sides Out: Reach through the gap and pull the panels right sides out.
Finish the Basket: Tuck the lining inside of the external panel. Align the external panel and lining seams with your fingers. Turn the raw edges from the gap inside and clip. Sew it with top stitching around the top to close the gap and finish the basket.
Enjoy your baskets!